This guide walks you through migrating your data from Dgraph Cloud to a self-managed Dgraph cluster running on Google Kubernetes Engine (GKE) or Amazon Elastic Kubernetes Service (EKS).

Prerequisites

Before starting the migration, ensure you have the following:

Cloud Account

Google Cloud Platform or AWS account with billing enabled

CLI Tools

Cloud CLI tools and kubectl installed and configured

Dgraph Access

Access to your Dgraph Cloud instance with export permissions

Docker

Docker installed (for custom images if needed)

Understanding kubectl

brew install kubectl

Essential kubectl Commands

Phase 1: Prepare Cloud Environment

1

Enable Required APIs

gcloud services enable container.googleapis.com
gcloud services enable compute.googleapis.com
gcloud services enable storage-api.googleapis.com
2

Install GKE auth plugin for kubectl

  gcloud components install gke-gcloud-auth-plugin

3

Create GKE Cluster

# Create a GKE cluster
gcloud container clusters create dgraph-cluster \
  --zone=us-central1-a \
  --num-nodes=3 \
  --machine-type=n1-standard-4 \
  --disk-size=100GB \
  --enable-autorepair \
  --enable-autoupgrade

# Get credentials for kubectl
gcloud container clusters get-credentials dgraph-cluster --zone=us-central1-a
This creates a 3-node cluster with sufficient resources for Dgraph. Adjust machine types and disk sizes based on your data volume.
4

Create Storage Bucket

# Create a Cloud Storage bucket for storing exports/backups
gsutil mb gs://your-dgraph-backups
Replace your-dgraph-backups with a globally unique bucket name.

Phase 2: Export Data from Dgraph Cloud

Ensure you have sufficient permissions to export data from your Dgraph Cloud instance. The export process may take time depending on your data size.

Exporting from Dgraph Cloud

Dgraph Cloud provides several methods for exporting your data, including admin API endpoints and the web interface.

Method 1: Using the Web Interface

1

Access Export Function

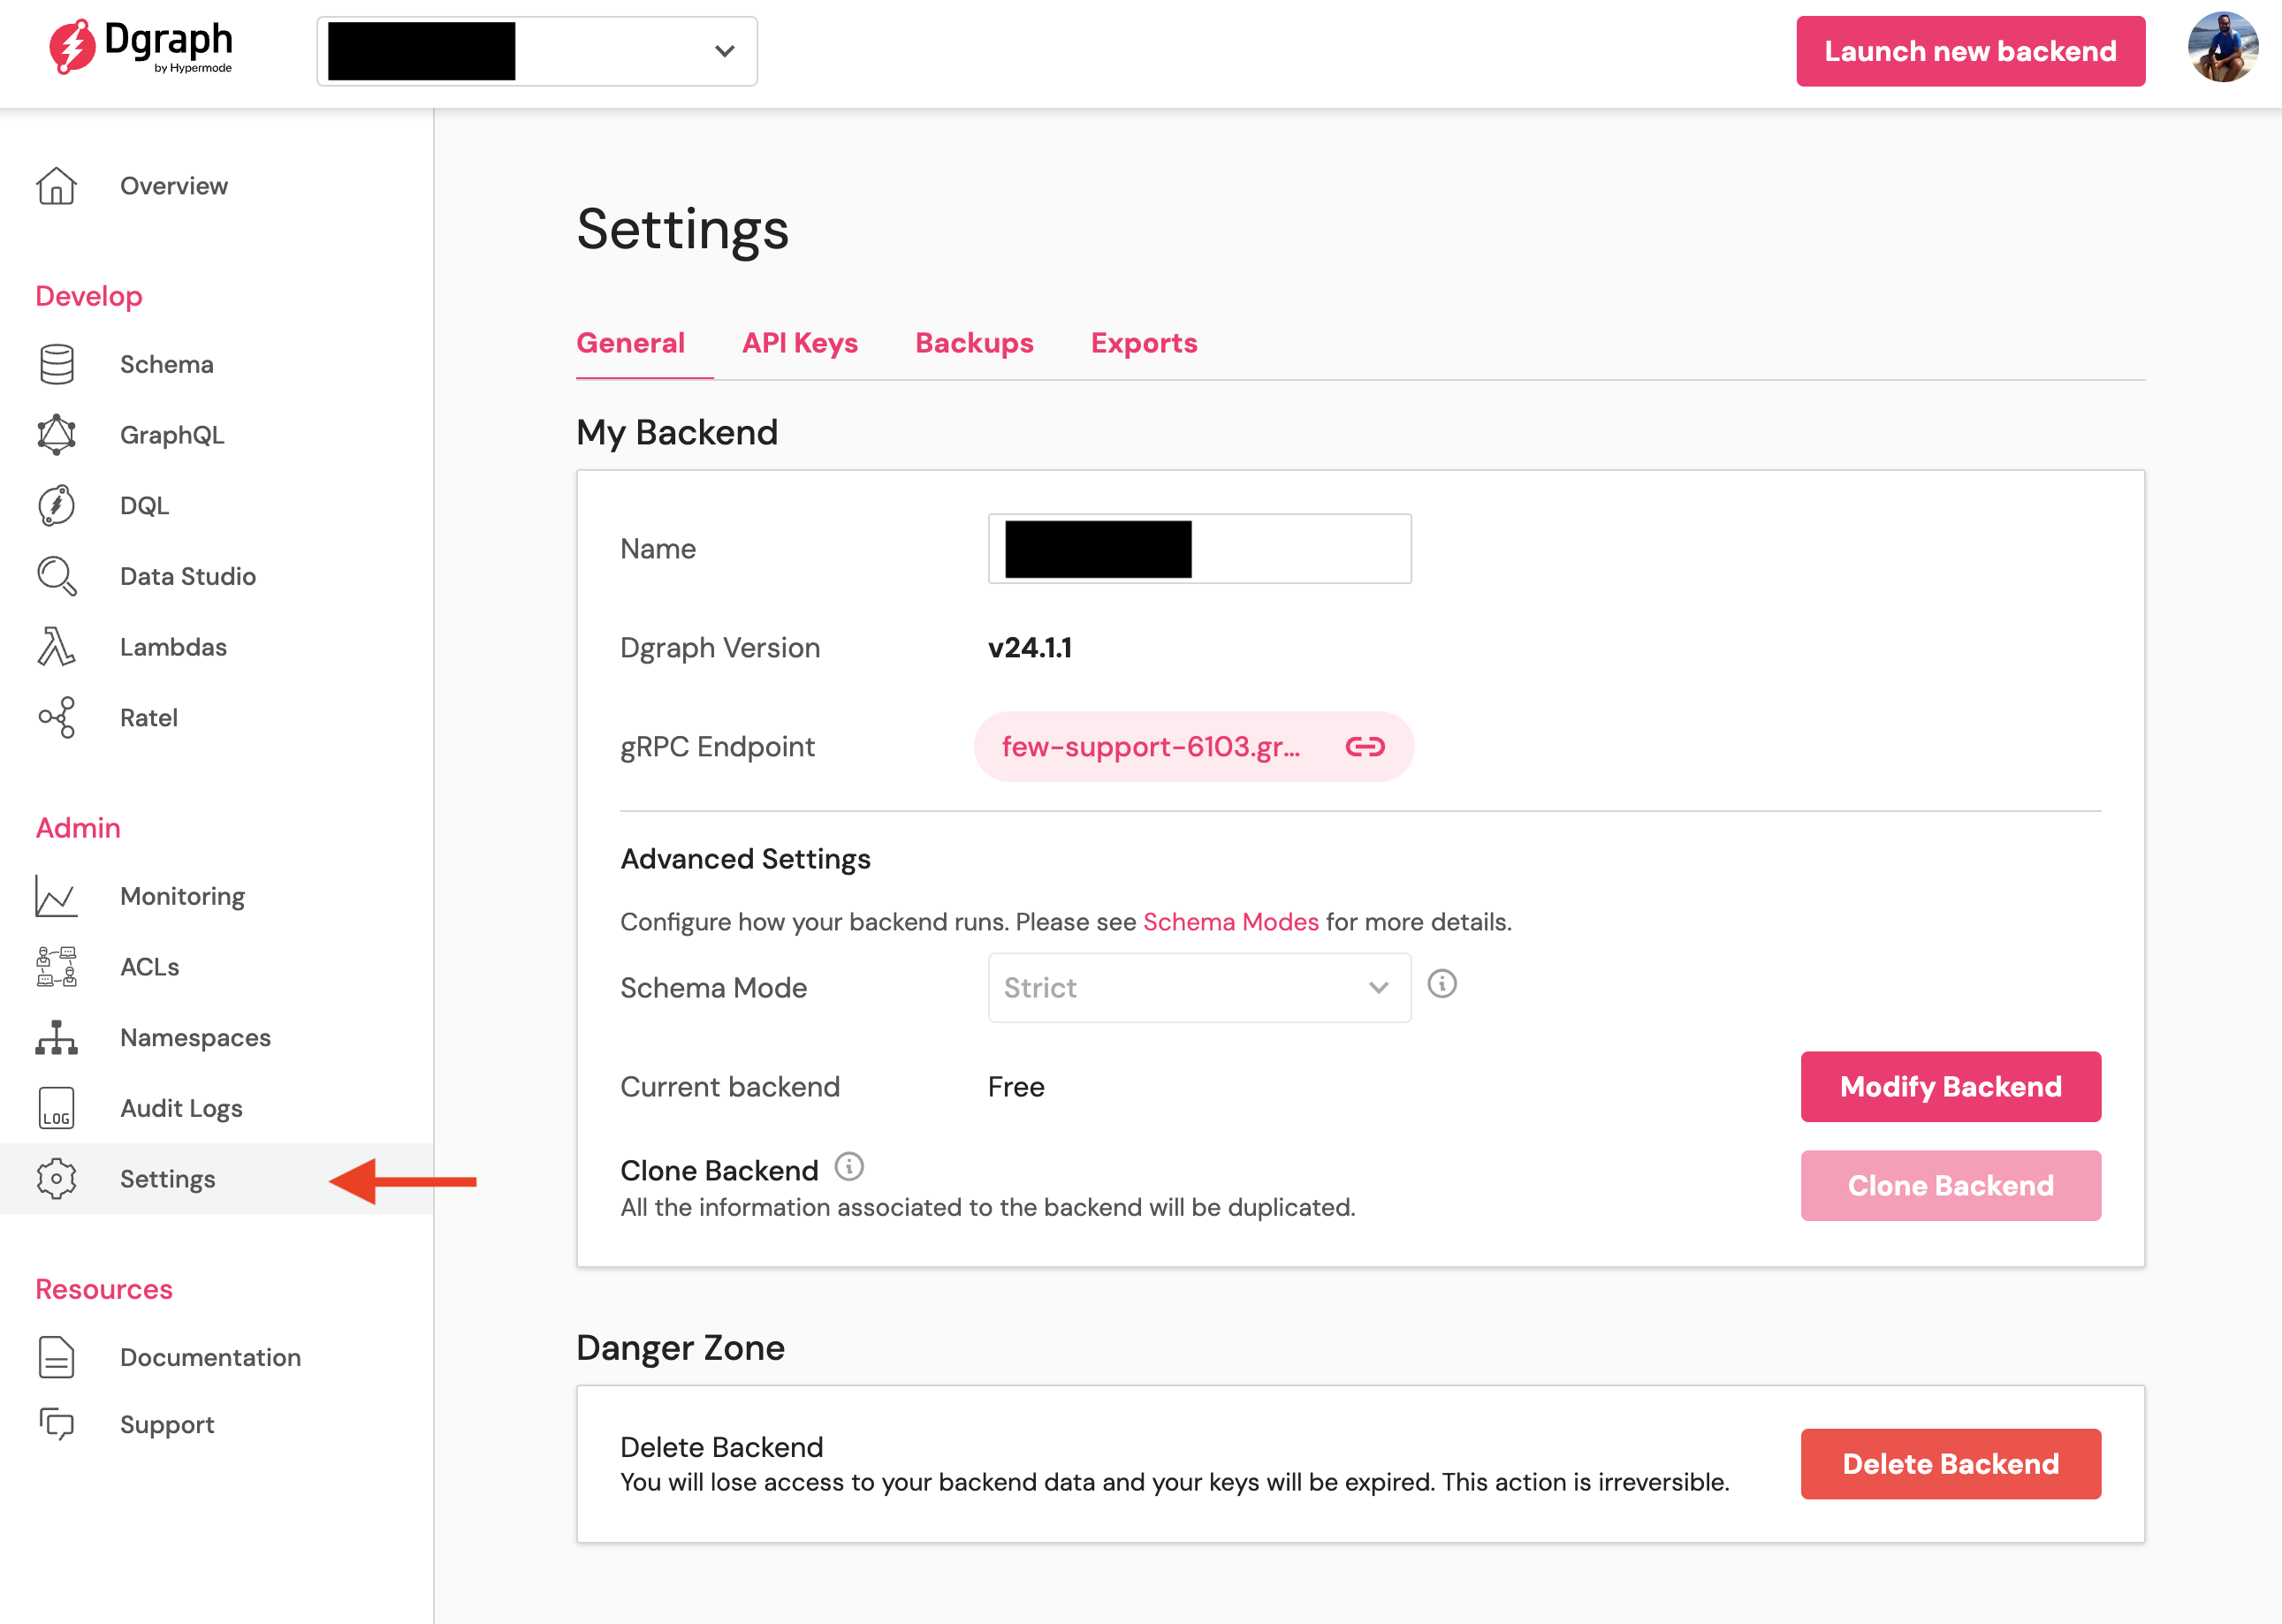
Log into your Dgraph Cloud dashboard and navigate to your cluster.Dgraph Cloud Dashboard
2

Navigate to Export

Click on the “Export” tab in your cluster management interface. Export Tab
Location
3

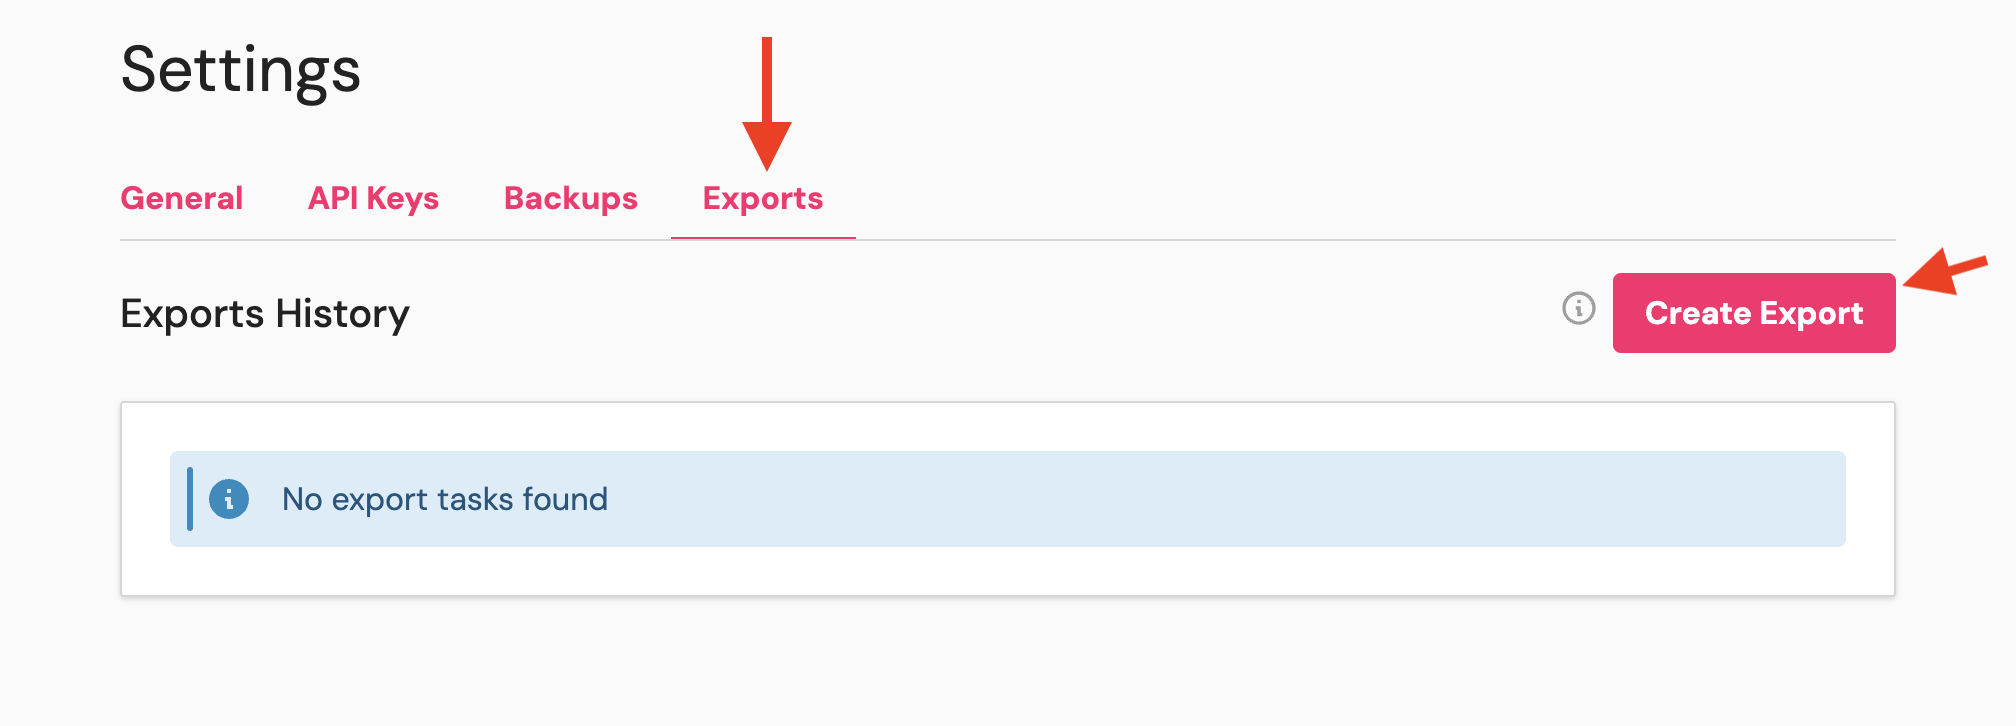
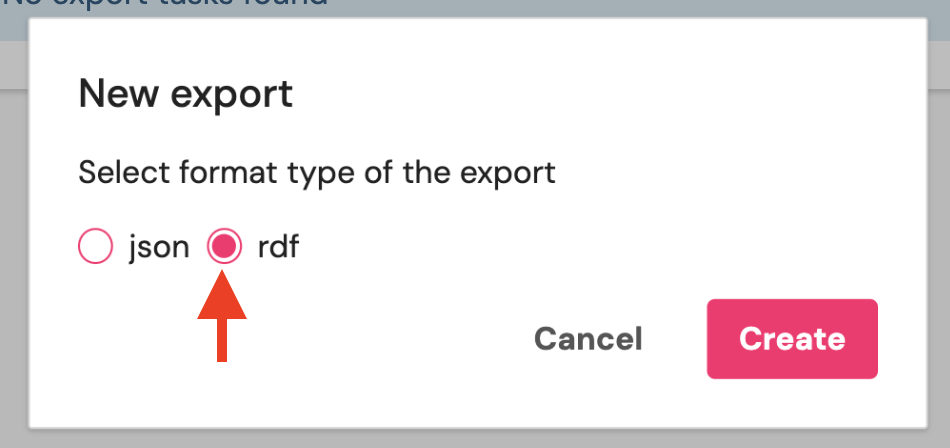
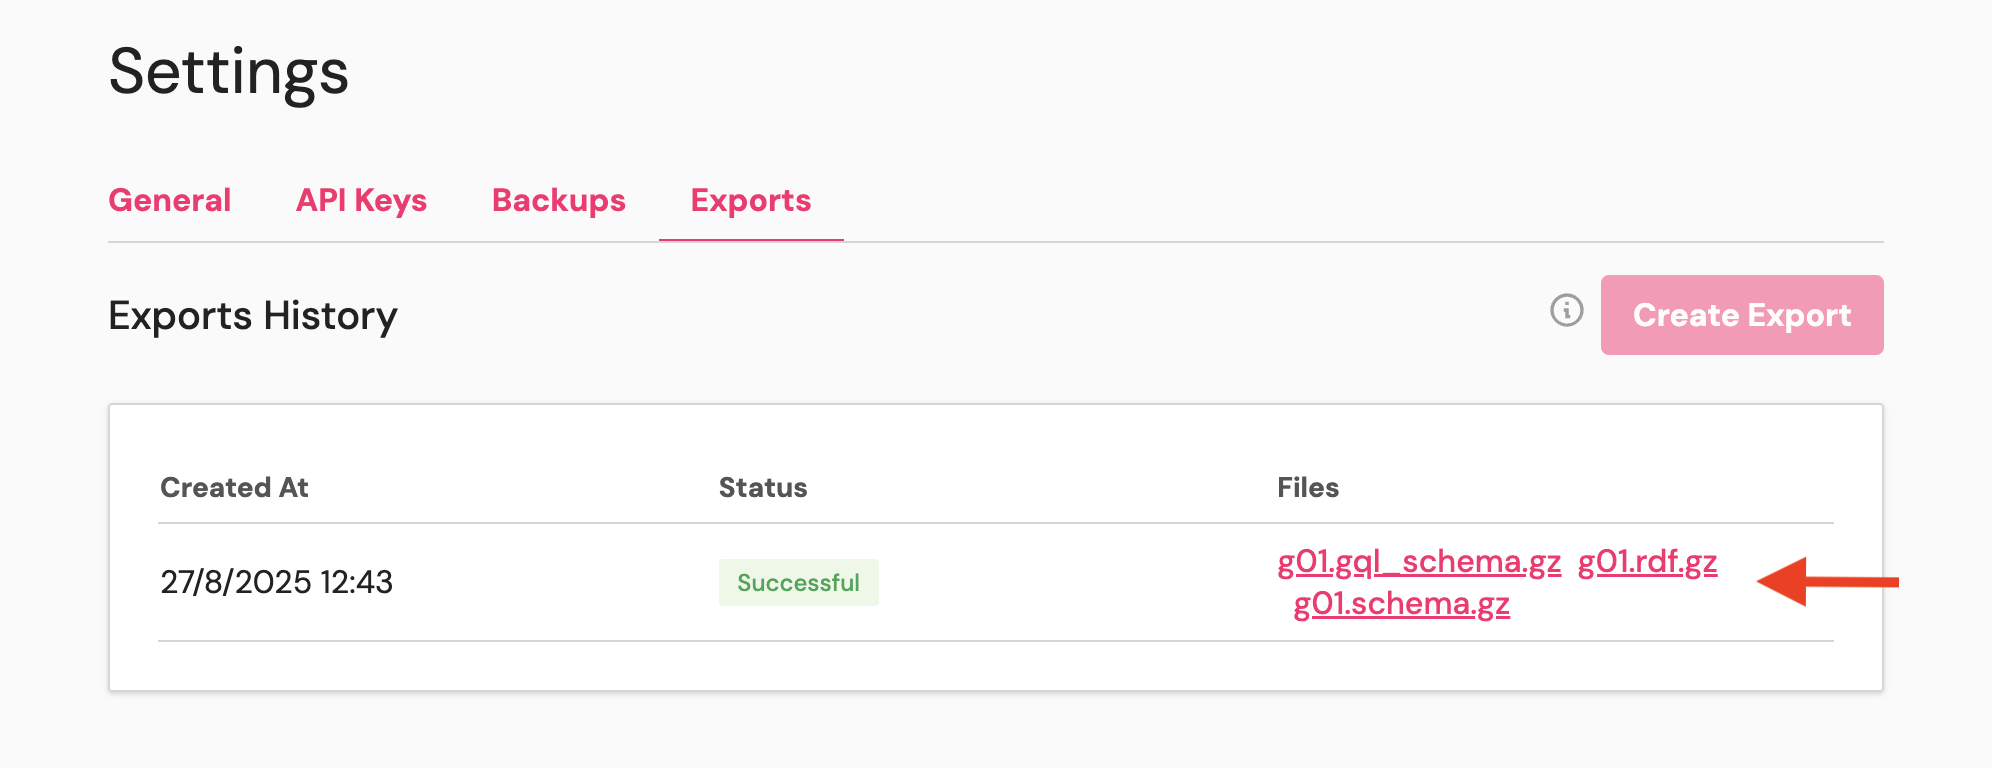
Configure Export Settings

Select your export format and destination. Dgraph Cloud supports JSON or RDF.\Export ConfigurationClick “Start Export” and monitor the progress. Large datasets may take several hours.
Click “Start Export” and monitor the progress. Large datasets may take several hours.
4

Download Exported Data

Once complete, download your exported data files.Export Download

Method 2: Using Admin API

curl -X POST https://your-cluster.grpc.cloud.dgraph.io/admin \
  -H "Content-Type: application/json" \
  -d '{"query": "{ state { groups { id members { id addr leader lastUpdate } } } }"}'

Method 3: Bulk export for large datasets

For datasets larger than 10 GB, use the bulk export feature:
curl -X POST https://your-cluster.grpc.cloud.dgraph.io/admin \
  -H "Content-Type: application/json" \
  -d '{
    "query": "mutation { 
      export(input: {
        destination: \"s3://your-backup-bucket/$(date +%Y-%m-%d)\",
        format: \"rdf\",
        namespace: 0
      }) { 
        response { 
          message 
          code 
        } 
      } 
    }"
  }'

Exporting from Hypermode Graphs

For larger datasets please contact Hypermode Support to facilitate your graph export.

Using admin endpoint

For smaller datasets you can use the admin endpoint to export your graph.
For larger datasets please contact Hypermode Support to facilitate your graph export.
curl --location 'https://<YOUR_CLUSTER_NAME>.hypermode.host/dgraph/admin' \
--header 'Content-Type: application/json' \
--header 'Dg-Auth: ••••••' \
--data '{"query":"mutation {\n  export(input: { format: \"rdf\" }) {\n    response {\n      message\n      code\n    }\n  }\n}","variables":{}}'

Upload Export To Cloud Storage

# Upload exported files to Cloud Storage
gsutil cp schema.txt gs://your-dgraph-backups/
gsutil cp *.rdf.gz gs://your-dgraph-backups/
gsutil cp *.schema.gz gs://your-dgraph-backups/

# Verify upload
gsutil ls -la gs://your-dgraph-backups/

Phase 3: Deploy Dgraph on Kubernetes

Create Namespace and Storage Class

What is a Namespace?
A Kubernetes namespace is a way to divide cluster resources between multiple users or projects. In this guide, we create a dgraph namespace to logically isolate all Dgraph-related resources (pods, services, volumes, etc.) from other workloads in your cluster. This makes management, access control, and resource monitoring easier.
What is a Storage Class?
A StorageClass in Kubernetes defines the type of storage (such as SSD or HDD) and its parameters (like performance, replication, or zone) for dynamically provisioned persistent volumes. By creating a StorageClass (e.g., fast-ssd), you tell Kubernetes how to create and manage storage for Dgraph pods, ensuring the right performance and durability for your data.
If you are using GKE, you can use the GKE Storage Class.
If you are using EKS, you can use the EKS Storage Class.
Create dgraph-namespace-gke.yaml file with the following content:
dgraph-namespace-gke.yaml
apiVersion: v1
kind: Namespace
metadata:
  name: dgraph
---
apiVersion: storage.k8s.io/v1
kind: StorageClass
metadata:
  name: fast-ssd
provisioner: kubernetes.io/gce-pd
parameters:
  type: pd-ssd
  zones: us-central1-a
allowVolumeExpansion: true
Apply the configuration:
Apply Configuration
kubectl apply -f dgraph-namespace-gke.yaml

Using Dgraph Helm Charts

What is a Helm Chart?
A Helm chart is a package of pre-configured Kubernetes resources that makes it easy to deploy and manage complex applications on Kubernetes clusters. Helm acts as a package manager for Kubernetes, similar to how apt or yum work for Linux distributions. A Helm chart defines all the resources (like Deployments, Services, StatefulSets, ConfigMaps, etc.) needed to run an application, along with customizable parameters.
Why use Helm Charts for Dgraph on Managed Kubernetes?
When using a managed Kubernetes service (such as GKE, EKS, or AKS), Helm charts simplify the deployment process by automating the creation and configuration of all the necessary Kubernetes resources for Dgraph. Dgraph maintains official Helm charts that encapsulate best practices for running Dgraph in production, including resource requests, persistent storage, replica management, and service exposure. By using these charts, you avoid manual configuration errors, ensure compatibility with Kubernetes best practices, and can easily upgrade or roll back your Dgraph deployment as needed.
1

Add Helm Repository

helm repo add dgraph https://charts.dgraph.io 
helm repo update 
1

Create Namespace

kubectl create namespace dgraph 
1

Deploy Dgraph

helm install dgraph dgraph/dgraph \
  --namespace dgraph \
  --set image.tag="v24.1.4" \
  --set alpha.persistence.storageClass="dgraph-storage" \
  --set alpha.persistence.size="500Gi" \
  --set zero.persistence.storageClass="dgraph-storage" \
  --set zero.persistence.size="100Gi" \
  --set alpha.replicaCount=3 \
  --set zero.replicaCount=3 \
  --set alpha.resources.requests.memory="8Gi" \
  --set alpha.resources.requests.cpu="2000m"

Exposing Dgraph Services

What is a LoadBalancer?
A LoadBalancer is a Kubernetes service type that creates a load balancer in front of a set of Pods. It allows you to expose your Dgraph services to the internet or to a private network.
What is an Ingress?
An Ingress is a Kubernetes resource that allows you to manage external access to your Dgraph services. It can route traffic to different services based on the hostname or path.
Create dgraph-alpha-eks.yaml file with the following content:
dgraph-alpha-eks.yaml
apiVersion: networking.k8s.io/v1
kind: Ingress
metadata:
  name: dgraph-ingress
  namespace: dgraph
  annotations:
    kubernetes.io/ingress.class: alb
    alb.ingress.kubernetes.io/scheme: internet-facing
    alb.ingress.kubernetes.io/target-type: ip
    alb.ingress.kubernetes.io/certificate-arn: arn:aws:acm:REGION:ACCOUNT:certificate/CERT-ID
spec:
  rules:
    - host: dgraph.yourdomain.com
      http:
        paths:
          - path: /
            pathType: Prefix
            backend:
              service:
                name: dgraph-dgraph-alpha
                port:
                  number: 8080 
Deploy the configuration with kubectl apply -f dgraph-alpha-eks.yaml:
Deploy Alpha
kubectl apply -f dgraph-alpha-eks.yaml

# Wait for Alpha pods to be ready
kubectl wait --for=condition=ready pod -l app=dgraph-alpha -n dgraph --timeout=300s

Phase 4: Import Data to Kubernetes Dgraph

The import process will download data from cloud storage and load it into your Dgraph cluster. Ensure your cluster has sufficient resources and storage.

Create Service Account for Import

1

Create GCP Service Account

# Create service account
gcloud iam service-accounts create dgraph-import \
  --display-name="Dgraph Import Service Account"

# Grant Storage Object Viewer permission
gcloud projects add-iam-policy-binding your-project-id \
  --member="serviceAccount:dgraph-import@your-project-id.iam.gserviceaccount.com" \
  --role="roles/storage.objectViewer"
2

Configure Workload Identity

# Allow Kubernetes service account to impersonate GCP service account
gcloud iam service-accounts add-iam-policy-binding \
  --role roles/iam.workloadIdentityUser \
  --member "serviceAccount:your-project-id.svc.id.goog[dgraph/dgraph-import-sa]" \
  dgraph-import@your-project-id.iam.gserviceaccount.com
3

Create Kubernetes Service Account

apiVersion: v1
kind: ServiceAccount
metadata:
  name: dgraph-import-sa
  namespace: dgraph
  annotations:
    iam.gke.io/gcp-service-account: dgraph-import@your-project-id.iam.gserviceaccount.com
---
apiVersion: rbac.authorization.k8s.io/v1
kind: Role
metadata:
  namespace: dgraph
  name: dgraph-import-role
rules:
- apiGroups: [""]
  resources: ["pods", "services"]
  verbs: ["get", "list"]
---
apiVersion: rbac.authorization.k8s.io/v1
kind: RoleBinding
metadata:
  name: dgraph-import-rolebinding
  namespace: dgraph
subjects:
- kind: ServiceAccount
  name: dgraph-import-sa
  namespace: dgraph
roleRef:
  kind: Role
  name: dgraph-import-role
  apiGroup: rbac.authorization.k8s.io

Create and Run Import Job

apiVersion: batch/v1
kind: Job
metadata:
  name: dgraph-data-import
  namespace: dgraph
spec:
  template:
    spec:
      serviceAccountName: dgraph-import-sa
      containers:
      - name: import
        image: google/cloud-sdk:alpine
        command:
        - /bin/sh
        - -c
        - |
          # Install dgraph
          apk add --no-cache wget
          wget https://github.com/dgraph-io/dgraph/releases/latest/download/dgraph-linux-amd64.tar.gz
          tar -xzf dgraph-linux-amd64.tar.gz
          chmod +x dgraph
          
          # Download data from Cloud Storage
          gsutil cp gs://your-dgraph-backups/*.gz ./
          gsutil cp gs://your-dgraph-backups/schema.txt ./
          
          # Decompress files
          gunzip *.gz
          
          # Import schema first
          ./dgraph live --schema=schema.txt --alpha=dgraph-alpha.dgraph.svc.cluster.local:9080 --zero=dgraph-zero.dgraph.svc.cluster.local:5080
          
          # Import data
          ./dgraph live --files=*.rdf --alpha=dgraph-alpha.dgraph.svc.cluster.local:9080 --zero=dgraph-zero.dgraph.svc.cluster.local:5080
      restartPolicy: OnFailure
  backoffLimit: 3
The import process may take significant time depending on your data size. Monitor the logs to track progress and identify any issues.

Phase 5: Verification and Testing

1

Get External IP/Endpoint

# Get the external IP of your Dgraph service
kubectl get service dgraph-alpha-public -n dgraph
It may take a few minutes for the LoadBalancer to assign an external IP address or hostname.
2

Test GraphQL Endpoint

# Test the GraphQL endpoint
curl -X POST \
  http://EXTERNAL-IP:8080/query \
  -H "Content-Type: application/json" \
  -d '{
    "query": "{ q(func: has(dgraph.type)) { count(uid) } }"
  }'
3

Verify Data Count

Compare the count of nodes between your Dgraph Cloud instance and the new Kubernetes deployment to ensure all data was migrated successfully.

Monitoring and Observability

1

Enable GKE Monitoring

# Enable monitoring for existing cluster
gcloud container clusters update dgraph-cluster \
  --zone=us-central1-a \
  --enable-cloud-monitoring \
  --enable-cloud-logging
2

Create Custom Dashboards

# Create monitoring dashboard for Dgraph
gcloud monitoring dashboards create --config-from-file=dgraph-dashboard.json

Security Hardening

Backup and Disaster Recovery

apiVersion: batch/v1
kind: CronJob
metadata:
  name: dgraph-backup
  namespace: dgraph
spec:
  schedule: "0 2 * * *"
  jobTemplate:
    spec:
      template:
        spec:
          serviceAccountName: dgraph-backup-sa
          containers:
          - name: backup
            image: google/cloud-sdk:alpine
            command:
            - /bin/sh
            - -c
            - |
              # Install dgraph
              apk add --no-cache wget
              wget https://github.com/dgraph-io/dgraph/releases/latest/download/dgraph-linux-amd64.tar.gz
              tar -xzf dgraph-linux-amd64.tar.gz
              chmod +x dgraph
              
              # Create backup
              ./dgraph export --alpha=dgraph-alpha.dgraph.svc.cluster.local:9080 --zero=dgraph-zero.dgraph.svc.cluster.local:5080
              
              # Upload to Cloud Storage
              gsutil cp export/dgraph.* gs://your-dgraph-backups/backups/$(date +%Y-%m-%d)/
          restartPolicy: OnFailure

Troubleshooting

Best Practices

Resource Planning

Size your nodes based on data volume and query patterns. Monitor resource usage and scale accordingly.

Backup Strategy

Implement regular automated backups to cloud storage using CronJobs.

Monitoring

Set up comprehensive monitoring with cloud-native solutions for production workloads.

High Availability

Deploy across multiple zones and use regional storage for production.

Cost Optimization

Use preemptible nodes for non-critical workloads to reduce costs by up to 80%.
# Create cluster with preemptible nodes
gcloud container clusters create dgraph-cluster-preemptible \
  --preemptible \
  --zone=us-central1-a \
  --num-nodes=3
Implement cluster autoscaling to automatically adjust node count based on demand.
# Enable autoscaling
gcloud container clusters update dgraph-cluster \
  --enable-autoscaling \
  --min-nodes=1 \
  --max-nodes=10 \
  --zone=us-central1-a

Performance Tuning

Migration Checklist

1

Pre-Migration

  • Backup existing Dgraph Cloud data
  • Test migration process in staging environment
  • Verify cloud provider quotas and limits
  • Plan maintenance window for production migration
2

During Migration

  • Export data from Dgraph Cloud
  • Upload data to cloud storage
  • Deploy Dgraph cluster on Kubernetes
  • Import data and verify integrity
  • Test application connectivity
3

Post-Migration

  • Verify data consistency and count
  • Update application connection strings
  • Set up monitoring and alerting
  • Configure backup strategy
  • Update DNS records if applicable
  • Decommission Dgraph Cloud instance (after verification)
Test this migration process thoroughly in a staging environment before migrating production data. Always maintain backups of your original data during the migration process.

Next Steps

After completing the migration, consider these additional steps:
  1. Set up CI/CD pipelines for application deployments
  2. Implement GitOps for Kubernetes configuration management
  3. Configure disaster recovery across multiple regions
  4. Optimize performance based on your specific workload patterns
  5. Set up comprehensive monitoring and alerting